All posts by Karen

Hooves in the House-A Sunday Caper

The signs were everywhere through the house and there was no question about it. Something had been there and it was NOT human. The prints, though no larger than a woman’s foot, were an entirely different shape – they were familiar and yet . . . what made them?

cow prints

Luckily the young sleuths arrived in the nick of time to help with the conundrum.

G3

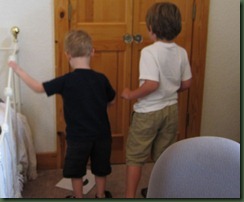
They discovered no less than seven sets of footprints about the main level of the house and upon close examination and consultation they agreed. These prints appeared to have been made by something bovine. It was, however, impossible to determine whether one or many animals had been in the house. Luckily for the home owner there were no other more disgusting signs of the animal(s).

The visiting sleuths shared their hypothesis with the home owner, but requested assistance with gathering data since they were both too young to drive around the property alone. Unfortunately, neither sleuth’s legs could reach the foot pedals of the needed vehicle, a jeep. The home owner therefore chauffeured the sleuths carrying one of the sets of footprints with them on the fact finding mission.

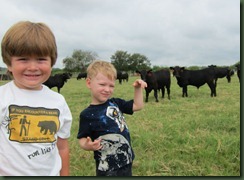
First they checked the front pasture, but the hooves of the cows there were much bigger than the prints they carried. Then they checked the back pasture; but the prints of the calves there were smaller than the prints. Finally, they checked the middle pasture where they found hoof prints that were just right. Actually, they were a perfect match to those found in the house.

G2

Feeling satisfied that they had solved the mystery, the young sleuths said it was time to head back to their office. “But wait,” said the home owner. “ How did the cow prints get in my house?” “Well,” said one of the youngsters, “you didn’t hire us to answer that question and our time on this job has been spent.” With that, they were gone . . . riding off into the sunset with their parent drivers . . . ready to face the next challenge and solve the next mystery.

If you ever need help solving a mystery at your house, you might want to call the young sleuths. They work pretty cheap and are especially good nature.

The Royals

I’ve been calling the bracelets below “my royals”, but in writing about them, I thought that “royal” should have more connotations that simply referring to a king, queen or other sovereign. My search for the truth, however, kept ending on sites pertaining to the Kansas City Royals. This was not what I was looking for. The term is used in phrases such as “he’s a royal pain in the . . . “ where it means extremely bad. It can also be used to mean excellent as in “let’s give them a royal welcome.” I was also amused to learn that royal can indicate a stag with large antlers that have 12 or more points on them. I wonder what The Royals in England think about that definition.

Unfortunately my royals are not full of the crown jewels and they aren’t sparkly, but at the least, the one on the right is shaped like a crown. Ok . . . so I’m stretching it just a bit. Give me a break!

royals

The “princess” bracelet on the right of the above photo is made from a combination of two of my etsy tutorials, the dimensional bracelet and the woven bracelet. I wanted a new shape in the middle and this tiara form emerged. I put in the stones, but felt it still needed something; therefore I added the weaving. I think it could be done with bright crystals and more elaboration, but I’m just a simple gal.

Princess

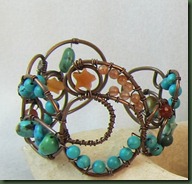
The “queen” bracelet below sports a star at the middle top and is adorned with lots of turquoise and some carnelian. It is the cursive style bracelet that just ended up with a little extra width and more dramatic swirls. I guess this one is fit for a Texas queen.

queen

My final assumption about “royal” is that the term can stand for extremes or outliers, whether they are good or bad. England’s Royals are outside the norm in status; The Kansas City Royals hope to be the same when they play ball, but may sometimes give their owners a “royal pain” and as for my bracelets . . . time and customers will tell.

More Leather Wrap Bracelet

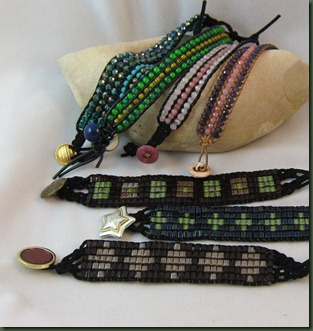
brace-5 row I thoroughly enjoy making the Chan Lu style bracelets that are so popular these days, but have ventured into something a bit different. The bracelets shown above also use leather and wrap, but only go around the wrist one time due to the width. The bracelets lounging upon the rock in the photo are all the three row style and those below are five rows. This style utilizes square knots (macramé) at the beginning and end of the bracelet. You can create a pattern or simply stick with one color. The tutorials for these bracelet come from Alisha of Beadifulnights.
The video is very well done and most beaders will find it easy to follow. I use a very soft 2mm ultra micro fiber cord that I purchase from Magpie Gemstones www.magpiegemstones.com I used the Greek leather cord for a couple of these and prefer the micro fiber cord due to the way it drapes. It comes in various colors and at this writing, you can get 10 yards for $5.95. I can definitely handle that! Give these a try if you like the look, but BEWARE! These are fun to make, quick to finish and the process is very addictive.

Fun with Fiber

From time to time I have attempted to add fiber to my designs, but haven’t had much luck. I’m not sure whether I just don’t like the look of fiber or I don’t like the look of fiber the way I use it. My bet is on the latter! Yet, seeing the fiber adorned designs of other jewelry makers participating in Lori Anderson’s Bead Soup, mentioned a few posts ago, I decided to try again.

I was fortunate to have the opportunity to go to Britex Fabrics (www.britexfabrics.com)  in San Francisco a couple of weeks ago. My daughter and I had allotted ourselves 45 minutes before we needed to hop a trolley and move on. It wasn’t enough time! There are multiple floors to this shop but I went straight up to the third floor filled with notions. I was pretty overwhelmed by the ribbons, trims, cords and buttons and had to keep talking to myself about remaining focused on what I needed. The pieces below utilize a couple of the ribbons I purchased.

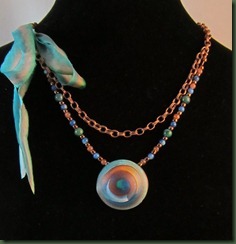
The pendant for the blue piece below is polymer clay and made by Nora Pero of Austin, TX. I intended to use the ribbon around the back of the piece, but used too many beads and then realized it wouldn’t show. I’m pleased with the colors.

polymer1

The bright piece below is whimsical and initiated with the torch enameled owl. I like the amber in it and appreciate the lightness it brings both in color and weight. I also used some faceted carnelian which hangs from the handmade chain. I thought the ribbon was a good match.

owl1

The challenge for me with fiber seems to now be how to do something besides a side bow. The additional challenge is to find one of the boutiques I serve or an independent customer who will like the look of fiber.

Coming Together

Families and friends often find themselves spread hither and yon both physically and emotionally. We may live in the same city as someone, care about that person, want to be with them and yet never find the time. Others live across states, oceans or continents, but make the time for one another when it counts. Those meaningful times build the memories we store in the albums of our lives. Last week was one of those times for our family. While the bride’s family came from across the waves in Germany, we packed in Texas and converged in joy for our son, the groom. San Francisco was a beautiful backdrop for the wedding, held on a 7th floor terrace overlooking the Bay Bridge. 540385_10151325843644112_74449676_n[1] We all dressed in our new duds and enjoyed the sights and sounds which were significant in this merger. The first photo below shows my husband, daughter, grandson, son in law and son. Below that you see my husband with my son and then with his grandson. My daughter sewed the little guy’s ensemble. Don’t the red shoes just make it? family wed guys g wed I was delighted to hear my daughter sing “Make of our hands, one hand . . . “ from West Side Story. She was unaccompanied and the notes were clear and lovely. Later, at the reception, the couple sang a duet followed by Brad’s rendition of Lyle Lovett’s “She’s No Lady, She’s Your (MY) Wife.” Someone captured both of these and put them on youtube.http://www.youtube.com/watch?v=VZvOaGrC9_c&feature=youtu.be So, now there is a new Mrs. Meador. I gladly welcome daughter-in-law Erin to our midst and appreciate the energy she brings to this merger and the love she gives to my son. It’s difficult to describe how I felt the day of the wedding. Mixed with the joy, was the simple sadness of giving an only son to another woman. Yes, he’s been in her arms for a long time, but now it’s final. I’ll still be his mother, but she is and should be the main woman in his life. . . . and so, a new cycle begins for us as it has for others. Coming together is more than a trip across the miles that separate us; it’s the beginning of new feelings, new relationships and new happiness. For that, I say “thank you Erin Connolly for becoming Mrs. Brad Meador.”    

Flying in Circles-Bead Soup Reveal


A prior post discussed bead soup and displayed photos of the lovely mixture of beads and findings that I received from Laura Demoya,  http://www.thebeadtherapist.blogspot.com/

Each of us involved in the bead soup event were given a specific date to reveal what we designed with the soup that we received. Today is my day.

clip_image004

When I received the bead soup, I was intrigued by the little purple ceramic bird shown. It made me think about the little critters that pass by my window as I work. This bird was made by Pajego Art House http://www.etsy.com/shop/PajegoArtHouse?ref=seller_info and was intended as a clasp. I decided to use it as a main embellishment in the necklace rather than as it was intended. The round pendant in the center is from White Clover Kiln http://www.etsy.com/shop/WhiteCloverKiln?ref=shop_sugg .

Before telling you more about the necklace, I’d like you to know more about the birds outside my window. The large window in my studio provides a hazard for some of the birds here at the ranch. They fly under the front porch roof and crash their little heads into the window. As my cat has grown older and become a bit slower in catching the birds from her tree perch, she has learned that if she is patient and sits on the outside window sill, a bird may crash into the window and become stunned long enough for her to capture it. I’ve tried to tell her that this is cheating, but she just doesn’t get it. It often seems to me that the birds go round and round in uneven circles as they try to figure out whether or not they can fly right into my studio.

The aforementioned tale explains the conception of the shape of the copper wire armature as well as the name of the necklace. I freeform manipulated the wire to go around as the birds sometimes do in flight.

It seemed obvious to me that the ceramic bird should be wired onto the armature. Yet, this little bird had different ideas. Each time I secured it with wire, I then held up the piece and the little bird turned upside down. I tried various wire gauges, said both nice and then harsh words to the inanimate object, but to no avail. He still hung upside down. Then I spotted the ribbon Laura sent in the soup. After I wrapped this around the back of the bird several times, he finally stayed in place. (Notice this bird became a “he” bird when I started having trouble with it.)

clip_image006

The rest of this piece needs little explanation as it was simply embellished with the beads as I wired them into place. It was a very pleasant process after I finally secured that bird right side up. The handmade chain in the back also sports bead links and a handmade clasp. The wire armature and handmade chain were dipped in Liver of Sulphur and then went for a couple of hours ride in the tumbler. At the same time, I dipped and tumbled the light gauge wire that I used for attaching the embellishments.

This was enjoyable to make and Laura afforded me the opportunity to work with ceramic pieces from another designer as well as to use crystals which I seldom work with. I used the other beads and sterling silver clasp in the other necklace shown below. The amethyst drusy focal for this piece is from Magpie Gemstones (www.magpiegemstones.com) Thanks to Lori Anderson for her grand organization of the bead soup project and for letting me participate.

clip_image008

As for flying in circles . . . I fear I do a good bit of that inside my studio and I really should slow down and relax more before I end up just as confused as some of those poor outside fliers!

Numerous other designers are revealing their bad soup pieces today. You will find their addresses at the following http://lorianderson-beadsoupblogparty.blogspot.com/2012/06/participants-of-6th-bead-soup-blog.html .

If At First You Don’t Succeed . . .

I thought I knew the correct ending for the title phrase, but I’ve learned that “try, try again” doesn’t always work.

For the past two months I’ve been trying to teach myself how to do torch enamel. It looked so easy when a friend demonstrated the technique at a meetup. She even let me do one following her demo and I did just fine. Yet, after ordering my own enamel and giving it a try, I found things weren’t so easy after all.

I don’t give up easily and believe that if I just practice something long and hard enough, I’ll eventually get it. That was not the case with torch enameling. I’ve been trying to enamel flat copper disks, but they either turned out bubbly or bumpy or mottled. Thinking I had one of the variables wrong,  I tried altering various things. I tried several different gauges of copper sheet metal. No luck. Then I tried various colors of enamel thinking perhaps one color had a problem. No luck. I even switched torches, trying three different ones. . . no luck. I also took my inferior disks to my friend who did the demo, but she didn’t know what was wrong either.

Finally, I was asked to bring my torch and help the same friend work with a large group at another meetup. During our time together, she let me use some of her enamel. LUCK! I torch enameled those disks like a pro and learned that the problem was the brand of enamel I was using. Although I’m relieved to know it wasn’t me, I’m upset that I spent so much time trying to alleviate my difficulty.

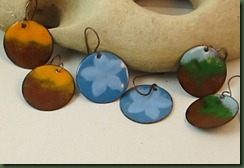
Now, I have purchased Thompsons’ enamels and am having a great time with the technique.  The blue earrings below look like they have some white on them, but this is just the glare.

enamel

This learning episode reminds me of when I was taking doctorate level statistics. The professor said we shouldn’t struggle with a problem more than 30 minutes before seeking assistance. I believe her advise stems to more things than statistics. The next time I can’t get something to work, I’m going to visit a successful friend.

July/August Classes

Please forgive this commercial post. Someone asked me to post a link to my classes and this is my sole format. Metal Mania II – Cold Connections August 18 – 2-4 PM $20       No Prerequisite      Minimum # of Participants: 4, Maximum: 12 Techniques Covered: Lacing/Sewing with Wire and Riveting image image image Metal Mania III – Hot Stuff August 25 – 1-4 PM $35     Prerequisite: Previous work with metal and wire       Minimum 3, Maximum 6 Techniques Introduced: Annealing, Sweat Soldering, Soldering Rings image image Wrapping Cabochons, Rocks and Objects  - Level II $35 Prerequisite: Cabs I or Previous Experience Wrapping Minimum 4, Maximum 7 July 28 1-4 PM Technique/Projects: Prong Wraps and Karen’s Wrap image Wrapping Cabochons, Rocks and Objects  - Level I $35   Prerequisite: Basic Wire Working Skills   Minimum # Participants 4, Maximum 7 TBA Techniques Covered:  Border Wrap and Multistrand Wrapimage   All Classes Held in the Classroom at Hobby Lobby in San Marcos, TX Please email me for enrollment or more information. Thanks!
Stars


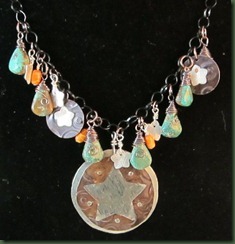
starry2

I made the pendant on the above necklace in preparation for the upcoming Cold Connections class that I’m teaching. It has a nickel silver back disk and I used a scrap book punch to cut the star hole out of a light gauge piece of copper which was dunked in liver of suphur. I riveted this to the silver. Then I got a little carried away with this star idea. I riveted a couple of other disks and wired more stars to the piece. I wanted a “Texas” Starry Starry Night. The beads are turquoise briolettes and spiney oyster barrels. The components hang from a purchased black chain.

Part of the difficulty with a piece like this is figuring out when to stop. I prepared more riveted stars and considered using more little silver components, but enough was enough! Two of those pieces are now earrings. I’m trying to learn that one consideration is designing a piece is the size of the person who will likely wear it. I wanted to wear this piece and since I’m only 5’1’’ I can’t have anything too big. This is about all the dangle my neck can handle!

This is the first time I’ve made a true “theme” piece. I supposed as a Texas necklace it might have included boots and an armadillo, but that’s just a bit too themey for me – don’t you think? Would Van Gogh be disgusted by the idea?