Category Archives: Pendants

A Tale of Two Prongs

The last two jewelry making classes that I’ve taught involved working on various types of prong settings. Although I don’t have any more of these scheduled, I’m still intrigued by the unique possibilities that soldered prongs present for jewelry construction.

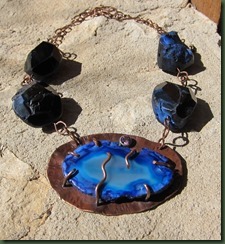
I think the blue agate piece below might be called “snakes” except that might not be a very appealing title for a customer. I wanted to add a tube setting to this piece and used a 6mm lab grown amethyst. It seems to help bring out the color in the agate.

blue1

There’s always considerable problem solving in jewelry construction even when you’ve made the best of plans. I share my mistakes as a pat on the back for those of you who don’t make them (anyone out there???) as well as encouragement for the rest of us. My mantra seems to be “where there’s a will, there’s a way”. After the entire pendant was complete – soldered, filed, sanded, formed, patinated, etc. – I carefully set the stone and positioned the prongs over it. So far so good. Then I placed the amethyst in the tube bezel and used my new bezel setter to secure it . . . beautiful. But then . . . plop. . . out came the stone. Not to be dismayed, I tried again and again and then . . . I realized that I had soldered the tube bezel onto the back plate upside down! I knew I should start again, remove the agate and go back to the torch station.; but I didn’t. I recently read that a renowned jewelry maker/teacher uses glue in certain situations. THIS was my situation. I got that little E-6000 tube out of the drawer, glued that little stone in the tube bezel and if I hadn’t fessed up, you might never have known.

blue2

The second prong setting is a green agate. I cut a piece of 22g copper sheet to create the partial bezel and then used a two-legged prong setting at the top. In essence, the bezel simply keep the stone from sliding out the bottom. The prong provides tension from the top and holds the piece against the back plate. I also used a little bit of that E-6000 on the back of the stone so I would feel better. The bezel is a bit of copper tubing soldered on the front and I embellished the pieces by wiring some small glass beads to the prong. By the way, twice I filed and sanded the back of the piece too closely where the prongs come through and had to re-solder them. Oh well, it gave me good practice!

green1   green2

Did I learn anything? I found that self deprecation when something doesn’t go right doesn’t help me in making jewelry. When a prong failed to solder properly, I just said “oh great, now I get to go back down the stairs to the torch room.” (More exercise and more practice can’t be all bad!) Now, if something doesn’t give me a problem, I’m suspicious. Could attitude be 9/10s of the work ethic?

For my soldering students, keep smiling and torch on.
More Fluttering

While the last entry about memories that flit by was quite figural, today I’m thinking of fluttering in a different way. There are things that flutter too.

I’m ready for the fluttering of Spring when the birds and butterflies show their colors and the weather is warmer. I want to see them out my studio window and feel this would help me get in a better humor for creating the Spring jewelry designs. Yet, one has to get started; so I did.

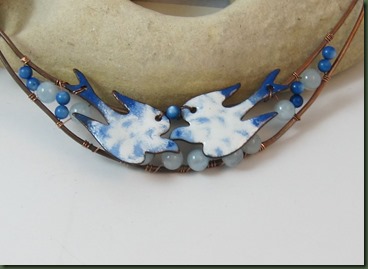
The first photo shows two doves that I torch enameled with multiple layers of blues and white. The bottoms of the doves rest on round beads giving them to illusion of being in flight. The copper wire armature joins with a handmade chain to go around the neck.

doves

I also torch enameled this second piece. It is cloisonné and I used sterling silver wire to mimic the markings of the butterfly wings. Then I wet packed various colors of enamel. It takes many layers and firings to build the enamel up to the top of the sterling wire and the wet packed enamel must dry each time before firing. I had to learn to be patient on this one.  Once complete, I smoothed the surface with an alumdun stone and then added a clear layer of enamel.

butterfly

I’m just hoping that soon these flutterings aren’t just in my mind and on my work bench. I want to see Spring here at the ranch in the very near future.

Crooked Halos

I don’t recall anyone (even my parents) ever calling me an angel, but in the last week I think I’ve connected with the type I would want to be.

After writing the Tree of Life tutorial for my etsy shop, I wanted to use the weaving in the round technique for something else. Weaving is a bit addictive and this one is especially interesting. So, I worked on creating an angel with this weave. This provided him or her with a 3-D body similar to the tree trunks. It’s also a project that doesn’t require as much weaving as the tree piece.

angel1-hang

I had several miss-starts trying to figure out how to make the angel wings. Finally I figured that out, but had no way to give the angel a head. The halo was tricky too and in the end I added an extra piece to that part. This makes it possible to adjust the halo forward, backward or more to the side depending on the attitude of the angel. When I finally figured that out, a customer wanted this piece to be a pin . . . back to the drawing board to figure out how to weave the pin into the back of the angel. The weaving is too tight to simply secure the pin with another piece of wire.

The silver angels below are made from artistic wire which is much more difficult to use in weaving than bare wire. I still like working with copper wire best.

angels2-pins

If I were an angel, I would want to be the kind, like these, that can adjust her halo depending upon the situation. Would that make me a divergent angel or just an wanna-be angel? hmm . . . that bears consideration. What kind would you want to be?

Tree Fall

Tree of Life pendants have been popular ever since I started making jewelry (and probably long before). I’ve made many and people always seem to want them. The other day, I decided to try a different type of tree. This one looks like it fell over and thus the name blog entry name, Tree Fall.

leaf weave 2

The above tree or branch, depending on how you see it, consists of eight pieces of wire that I wove in the round with lighter gauge copper wire. While working on it, I kept looking out the studio window to see how the dimension of most trees changes on the way up. My observations indicated that the diameter of the tree branch should reduce on the way up. I attempted to represent this by splitting the bundle of wire to create smaller and smaller twigs or branches.

I enjoyed making the above piece and decided to combine it with some of the copper sheet leaves shown in a previous blog. I also thought this would give participants in my leaf classes this weekend another choice for creation.

leaf weave 1

I soldered wire stems to the copper leaves, torched painted them and then put them in cooking oil to achieve the red color. Finally, I sealed them with an automotive spray. I worked the stems of the leaves into the weaving. I think this piece will hang vertically as opposed to the horizontal position of the first necklace. I’m still cogitating about that.

I created a slightly different look between the pieces with the wire weaving. I went over each larger gauge wire on the first one and under each on the second one. I found it much more difficult to go under, but like the look; so I guess I’ll just need more practice.

The weaving continues to intrigue me leading to hours of play with the wire. This is confirmed by the callouses I’m building on my fingers. The difficult part is resisting closure and allowed myself to experiment with the weaves without a preconceived notion of what I can make. I have a book about Free Play sitting on my desk and it reminds me of the importance of play, like my experimental weaving, in the creative process. Author Stephen Nachmanovitch states “There is a time to do just anything, to experiment without fear of consequences. to have a play space safe from criticism . . . “ I’ve just got to remember that self criticism is also detrimental to creativity  and and try to think more positively about my play.

Here a Duzy, There a Druzy, Everywhere a . . .

I like to use a druzy now and then in a piece of jewelry; yet when showing it to a customer, I usually end up explaining the term. Wilkipedia says that “In geological usage druse or druzy is a coating of fine crystals on a rock fracture surface, vein . . . or geode.”I think that’s a pretty neat occurrence. . .  it’s something beautiful and sparkly where there may have been little of interest previously.

druzy

In the past, I’ve mainly worked with gemstones that contain small pieces of druzy yet the color of the stone remains predominant. Lately, however, I’ve found a few druzies where the crystalline formation is large enough to stand on its own. They are somewhat delicate with which to work and I’ve done my best to capture them in bezels that will protect the structure.


cobalt1

I’ve been told that dying the coablt druzy, shown above, is rather difficulty, but I’m certainly pleased with the the perseverance of the lapidary artist who cut this one.

Is there a druzy in your future?

Experimentation

This part of the summer when the boutiques I serve are closing out summer merchandise prior to bringing in Fall clothing, I have time to experiment with new ideas for upcoming jewelry designs.

I have to get into a different mindset for experimenting and remind myself that there’s no pressure for anything to “turn out”. I don’t have to produce anything; I just need to play.

Play this year has come mainly in the form of torch enameling. It started when I taught the Torch Enamel II workshop a few weeks ago. I had a super set of participants and we had such fun. Teaching always propels me forward as I challenge myself to make difficult processes easy for students. I worked on champleve and sgraffito and have carried some of that into the experiments I’m doing now. Below are a couple of things that seem to be working well.

sawn earrings   torch ear 

I’ve also explored “holiness” in several forms and found it to be fun when incorporated with the torch enameling. I just kept singing “Holy, Holy, Holy . . . “ and things kept hatching. Hmmm . . . I wonder what would happened if I sang a different song . . . ? Any suggestions???

   azurite

  enamel and earringsear1

Today, I’m experimenting with different shapes and sawing. I’m conscious of the fact that it’s not production – it’s inquiry and learning. We’ll see what turns out. Wish me luck!

Sharing Ideas

I enjoy sharing creative ideas through conversation, problem solving, teaching and publishing. While these ideas used to come in musical or educational form, lately they’ve been in the design arena.

Think week I received the latest copy of Step by Step Magazine that contains my Tiara Necklace design and tutorial. The publication did a nice job of photographing the piece for the main page and I was glad the other photos that I took worked out well. I created this piece while playing with wire one day. I made my own “princess for the day” tiara, turned it upside down and used it as a necklace.

Tiara-step by step

While preparing to post about this piece, I realized that I hadn’t yet shared the cabochon wrap that was in the June-July publication of the same magazine. This evolved when I used my Synectics training to think of an analogy in which one thing captures or holds on to another without help from the latter. I thought about the way a child hugs an adult by wrapping his arms and legs around the person. You can see the “arms and legs” of the silver wire wrapping around the stone in the photo below.

Step by step

Seeing this pieces in print helps urge me to do more and I certainly hope the well doesn’t run dry any time soon.

Color Your World

What colors your world? There is probably an obvious literal answer if you simply look outdoors. Here in the Texas Hill Country, we’re enjoying the Spring growth that follows the blooming Bluebonnets and other wildflowers. We’ve had a bit of rain and our pastures here at Dreamcatcher Ranch have greened nicely. You can see someone else who colors our world in the photo below.

blue G

It seems only fitting that I try to add more color to my metal work and “Spring” it up a bit at this time of the year. Of course, the torch enameling has helped with this, but there are other techniques. I’ve used various purchased patinas to help provide more color but largely stayed with Liver of Sulphur. Yesterday I varied my approach and was relatively pleased with the results.

colors I added some ammonia to the LOS solution before dipping the butterfly. It’s hard to identify in the photo, but it reveals more of an iridescent look. I created the circles on the butterfly using a technique created and taught to me by Carolyn Gebert. She demonstrated how to place the metal inside an embossing template and hammer it. I also used a torch enameled piece of metal inside the bezel. The circles were formed (or malformed) by hammering them on a sandbag. Then, I torch fired each piece. It’s always exciting to see what develops with this process and I have no idea how to exactly repeat what I achieve. I soldered a tube rivet onto the larger circle and used an amethyst crystal. The other two circles are adorned with small sterling silver balls. I think these three will become a necklace. I realize that the Spring colors outdoors will soon change as our usually harsh summer commences but perhaps knowing they are short lived helps us appreciate them even more. Cognizant of the fact that the colors on the metal can also dissipate in the atmosphere, I sealed all of these pieces with an automotive spray paint sealer which I’ve used before. You can’t preserve everything . . . but I try. I’m just glad that my world gets colored in many different ways and hope yours does too.

Positive Comments

Isn’t is wonderful how a few truthful and positive words can provide a great moral boost? When I show my work to someone, I’m really just sharing and not necessarily looking for accolades. I think my family should just know what I’ve been making. Luckily, they’ve learned to accept my “show and tell” without feeling any real obligation to like what they see. I’ve tried to encourage them to view my process and growth rather than just the art.

Today, I spent a good deal of time trying some new torch enameling techniques.

enamel

I’ve been working in my comfort zone for quite some time following the class that I taught and decided that today was the day to stretch. (sometimes stretching is hard)

First, that little bird pendant gave me fits. It’s difficult to tell the details on her from this photo, but suffice it to say they are there. It takes numerous firings on this type design and several times after I applied the enamel and set the pendant on the trivet for torching, the whole thing fell off on the floor. Then I had to start anew. I think it was a test to see if I really wanted to persevere. I worked through the frustration and when I brought the pendant to my spouse he actually knew what it was supposed to be. That provided a positive stroke. He even told me that it was an orange tanager. (If I had been on the ball, I would have said that was what I planned – but I wasn’t on the ball.) His remarks made me forget my frustration.

The final pair of earrings for the day was the orange and purple pair which I designed based on a piece of fabric called dimples. I thought they were really ugly, but when I showed them to my husband he said “great colors”. That helped me see them differently and I accepted another positive stroke. I guess they are rather funky.

My adult piano students used to say they always knew when I was going to correct something in their playing because I started with a compliment. I think some of them secretly wished I would just get to the correction. Yet, it helped me to find the good in what they had done rather than just searching for something to fix. I now need to find the good in my own work before worrying about what went wrong.

I wouldn’t want to hear “fake” positive comment, but once in a while a sincere one is really welcomed. Focusing on what turned out well can help me retain that part of a piece while seeking to improve the part that wasn’t so good. Oft times I only see the problems in the piece and need someone else to point out what worked well.

I am thankful for a supportive spouse who is always truthful and helps me see the good when I’ve missed it.

Sharing Hearts

It isn’t even February, yet, I’m making heart shaped pendants. It just seems like the thing to do! I prepared the two in the photo because I wanted to experiment with making bails for an upcoming meetup of designers.

hearts

The bail for the heart on the left is made from a small piece of copper sheet soldered on the back. The one on the right utilizes a bail made from wire, also soldered on the back. My grandson told me that this heart has heartworms! Hmm, I really didn’t see it that way, but I’m not three years old. I used my new leather sand bag as a base for creating the doming effect on both pieces. I dimpled them with dimple pliers. By the way, thanks to a talented friend, I was able to saw the heart shape from the middle of each piece. Thanks Adele!

Following is another photo of a heart pendant made for the same meetup. I torch enameled the copper rectangle and riveted the heart, cut out of the center of a piece shown above, to the metal. I used a tube rivet which gives it some dimension. The back shows the small piece of tube I soldered to the metal for a bail.

heartfront  tube bezel

The photo below doesn’t seem to fit with this blog entry . . . yet, it is the essence of “heart”. It was commissioned by one adult sister for another in remembrance of their girlhood when they watched the cardinals together. I’ve shared this previously online, but wanted to repeat. Wouldn’t you say the giving sister was “sharing heart”?

cardinal complete

As Valentine’s Day approaches, I hope that commercialism doesn’t remove the heart from the giving. It often seems that men, in particular, are harassed by the advertisements to a point where they feel they must spend a good deal of money for their sweeties. I hope the men I know will understand that this woman just wants a little “heart” in one form or another.