Category Archives: Wire Work

Do You Vary?

I do!

Vary  “. . . To make or cause changes in the characteristics or attributes of; modify or alter “ www.answers.com/topic/vary

A few months ago, I told you that I was fortunate to have one of my bracelet designs on the cover of Step by Step Wire Jewelry magazine.

cover

This week, I’m guiding some of my friends as they make this bracelet at our Faux meetup. I always practice before I teach/lead and this time I decided to “VARY” the bracelet. This is one of my favorite things to do with designs as I employ various creative thinking techniques to change things without completely losing the character of the original designs.  Below is my practice piece which is varied through magnification (enlarging) and combining (adding the beads to the metal strip in unique positions).

brac1

I torch enameled and then sealed a piece of 26g copper sheet before cutting the shape for the bracelet. Then I wove 26g wire over 14g wire and through holes in the metal on both sides. I added the turquoise rounds within the weaving to vary the technique.

This change has initiated more consideration of other possibilities and ways to vary this design.

Yes, I do vary - - - because the opposite would be to “conform” and that’s just not my style!

Just Do the Next Thing . . .

As I likely have mentioned before, my great grandmother, Dee Dee Lewis, supported not only herself (post husband) but also my grandmother (post husband) and her two children. Yes, we are a family of lingering women. When someone would get in a muddle and become anxious about what they should do, Dee Dee always said “just do the next thing.” It didn’t really think that was very helpful and often couldn’t even figure out what the next thing was. However, lately, that little phrase has been sounding in my brain and I’ve follow the tenet behind it. I’m no busier than the next person, but sometimes I need a little help from my elders.

I enjoyed the past holidays and actually took some time away from designing to sit quietly and do some crocheting and sewing. It was a welcome respite and gave these hands time to recover from the hurried wire and metal work pre-Christmas.

Then it was suddenly January and there was a list of things that needed ASAP attention. First, I needed products for a silent auction donation to the San Marcos River Foundation. I wanted them to have a choice and they selected the blue tree below and some copper earrings from the three things I offered.

blue tree     Raindrop necklace

 tree-tourmaline

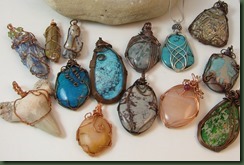
The next thing . . . I needed product examples for the three January-February classes I was teaching. Luckily, I had most of the wrapped rocks and cabachons below already done; yet I did need to practice.
Cabs 2014

Then . . . the next thing . . . I needed to create new products for the Hot Metal Mania class coming in February. These took a while as I tried to differentiate the level of skill needed for the products.

Hot Metal

When I completed enough of the Hot products to at least get information out to students, I decided to take a day off, but then the phone rang. Someone that I convinced to be the program chair for one of my groups needed a project/leader for February. She wanted something in metal. I got her into this . . . so I said yes and arose fromf my chair and back to the bench.
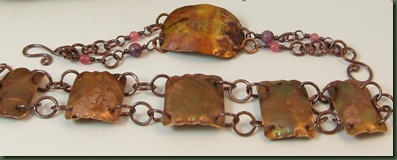
bracelets1  

bracelet 3

Feeling pleased to have the former completed and tired of following Dee Dee’s advise, I took a some time to try a new scroll design. I thought I was making a bird, but I do believe it turned out to be a hen. She is soldered and the wing flower is torch enameled
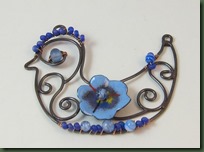
chicken


Today, I realize that “the next thing” is preparing the products for the Torch Enameling class which is in two weeks. I guess you know what I’ll be working on today.  OK, great grandmother, I think you were right! At least I’m having fun.

Cover Girl

I was pleased to see my original bracelets on the cover of this month’s Step By Step Wire Jewelry Publication. I’ve had a number of other pieces in the magazine, but not previously on the cover.

cover

The editor named them “Taos” which I think is fitting for the design. There are many different variations for this style. For example, the weaving can be varied depending on the number of outside wires used and the specific weaving technique. I’ve also varied it from weaving into a single row of holes down the center to holes on each side of the middle sheet. You can also see that sometimes I use my own torch enameled discs as embellishments while other times I use gemstones. I thought the two hole turquoise discs, which I have only seen at one bead show and never again, turned out nice. At the time I purchased them I couldn’t think what in the world I would do with them. Once I figured it out, of course I couldn’t find them again. That’s why I ended up making the two hole torch enameled discs which I offer on etsy. There’s a link to it on my website blog page www.dreamcatcherranch.net/designs.

If you have interest in these and pick up the publication, you’ll find a full tutorial complete with my photos of the process. I hope you enjoy it.

Crooked Halos

I don’t recall anyone (even my parents) ever calling me an angel, but in the last week I think I’ve connected with the type I would want to be.

After writing the Tree of Life tutorial for my etsy shop, I wanted to use the weaving in the round technique for something else. Weaving is a bit addictive and this one is especially interesting. So, I worked on creating an angel with this weave. This provided him or her with a 3-D body similar to the tree trunks. It’s also a project that doesn’t require as much weaving as the tree piece.

angel1-hang

I had several miss-starts trying to figure out how to make the angel wings. Finally I figured that out, but had no way to give the angel a head. The halo was tricky too and in the end I added an extra piece to that part. This makes it possible to adjust the halo forward, backward or more to the side depending on the attitude of the angel. When I finally figured that out, a customer wanted this piece to be a pin . . . back to the drawing board to figure out how to weave the pin into the back of the angel. The weaving is too tight to simply secure the pin with another piece of wire.

The silver angels below are made from artistic wire which is much more difficult to use in weaving than bare wire. I still like working with copper wire best.

angels2-pins

If I were an angel, I would want to be the kind, like these, that can adjust her halo depending upon the situation. Would that make me a divergent angel or just an wanna-be angel? hmm . . . that bears consideration. What kind would you want to be?

Tree Fall

Tree of Life pendants have been popular ever since I started making jewelry (and probably long before). I’ve made many and people always seem to want them. The other day, I decided to try a different type of tree. This one looks like it fell over and thus the name blog entry name, Tree Fall.

leaf weave 2

The above tree or branch, depending on how you see it, consists of eight pieces of wire that I wove in the round with lighter gauge copper wire. While working on it, I kept looking out the studio window to see how the dimension of most trees changes on the way up. My observations indicated that the diameter of the tree branch should reduce on the way up. I attempted to represent this by splitting the bundle of wire to create smaller and smaller twigs or branches.

I enjoyed making the above piece and decided to combine it with some of the copper sheet leaves shown in a previous blog. I also thought this would give participants in my leaf classes this weekend another choice for creation.

leaf weave 1

I soldered wire stems to the copper leaves, torched painted them and then put them in cooking oil to achieve the red color. Finally, I sealed them with an automotive spray. I worked the stems of the leaves into the weaving. I think this piece will hang vertically as opposed to the horizontal position of the first necklace. I’m still cogitating about that.

I created a slightly different look between the pieces with the wire weaving. I went over each larger gauge wire on the first one and under each on the second one. I found it much more difficult to go under, but like the look; so I guess I’ll just need more practice.

The weaving continues to intrigue me leading to hours of play with the wire. This is confirmed by the callouses I’m building on my fingers. The difficult part is resisting closure and allowed myself to experiment with the weaves without a preconceived notion of what I can make. I have a book about Free Play sitting on my desk and it reminds me of the importance of play, like my experimental weaving, in the creative process. Author Stephen Nachmanovitch states “There is a time to do just anything, to experiment without fear of consequences. to have a play space safe from criticism . . . “ I’ve just got to remember that self criticism is also detrimental to creativity  and and try to think more positively about my play.

More Fall

That’s what I’m wishing for – More Fall. Actually, I would take any Fall at all since we are having 100 degree plus days here in central Texas. I’m sure Fall is coming, but I’m a bit premature with my daily wish.

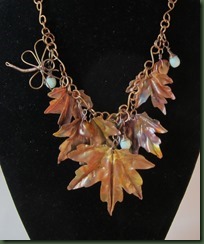
Nevertheless, it is Fall in the studio. Some of you have previously seen the leaves I’ve posted elsewhere. These are for a class that I’m preparing.

chain necklace

These copper leaves were torch painted with a little butane torch. Their friend, the dragonfly, is from a wire tutorial I just finished for my etsy shop. It was requested by the people who wanted the leaf workshop.

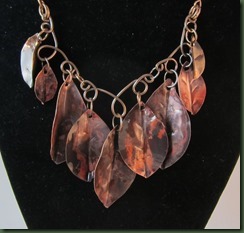
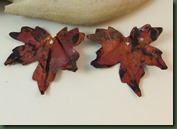
Here’s a little different type leaf. I turned these red by annealing them with the torch and then throwing them in Crisco cooking oil. I also tried some in sesame oil and the red is about the same.

red leaf

Here’s a comparison of the cooking oil vs. the sesame oil. The sesame dipped leaf is on the left. The difference in color is slight.

red leaf comparison

Finally, this set of leaves was also torch painted and I made a brass chain. I like the difference in color. Torch painting always provides surprises.

leaf brass

The only time consuming part of this project is cutting out each leaf. It makes my hands unhappy!

Let’s just hope my leaves are a harbinger of Fall (the real one with the cooler temperatures). I’m ready for clothes with leaves and shoes with toes!

Sharing Ideas

I enjoy sharing creative ideas through conversation, problem solving, teaching and publishing. While these ideas used to come in musical or educational form, lately they’ve been in the design arena.

Think week I received the latest copy of Step by Step Magazine that contains my Tiara Necklace design and tutorial. The publication did a nice job of photographing the piece for the main page and I was glad the other photos that I took worked out well. I created this piece while playing with wire one day. I made my own “princess for the day” tiara, turned it upside down and used it as a necklace.

Tiara-step by step

While preparing to post about this piece, I realized that I hadn’t yet shared the cabochon wrap that was in the June-July publication of the same magazine. This evolved when I used my Synectics training to think of an analogy in which one thing captures or holds on to another without help from the latter. I thought about the way a child hugs an adult by wrapping his arms and legs around the person. You can see the “arms and legs” of the silver wire wrapping around the stone in the photo below.

Step by step

Seeing this pieces in print helps urge me to do more and I certainly hope the well doesn’t run dry any time soon.

Visiting Old Friends

The title of this blog entry could be insulting and/or misleading but I mean no insult. The older I get, the more I balk at the “O” term in most any description. Most of my friends are younger than I am and even those who aren’t certainly can’t be called old. So, if you are one of the latter, please don’t get your dander up!

My spouse and I had a discussion the other day about when you were a senior citizen. Is it when you go on Medicare or Social Security? We couldn’t come to any consensus, but determined we weren’t there yet. I seem to recall a similar discussion about “middle age” many years ago. We never thought we were there either! I can, however, state that we are pleased not to be adolescent! I think I prefer wrinkles to acne.

I revisited some “old” friends in my jewelry designs and wanted to share a few new photos with you. If we were giving these an age, the wave bracelet on the right is definitely a senior citizen. I’ve been making these for about 4 years and it’s been fun to update them every once in a while. The one on the left is just a kid and will hopefully age nicely.

bracelet Lisa 1

This next group comes from a middle aged design. I think it is almost 3 years old. I can’t enumerate how many ways I’ve made this using different shapes and sizes on the top or focal of the bracelet. It remains one of the most popular of my designs and folks are still buying the tutorial for it in my etsy shop.

bracelet Lisa 2

Finally, the design below is just a teenager. It’s a few months old and I’m pleased that Step by Step Wire Jewelry magazine will publish this one with my tutorial in December. It, too, has many variations and will hopefully survive adolescence.

bracelet Lisa 3

I don’t mind if some of these designs are called “old”. They seldom get any wrinkles and if they do, I can repair those.  I’m just pleased to have them last and remain popular.

Ah, if only the same were true with people. I guess age is just relative to those around you. I think I’ll go visit Mamaw at the nursing home tomorrow and make myself feel younger. I think that just might work.

Out on a Whim


Whimsy. . . an excessively playful expression . .

I think the title fits the fun I’ve been having making woven copper branches and adorning them with depictions of nature.

The woven branch idea happened quite by chance. I was meeting a friend and knew I would be too early for our appointed time; so, as usual, I took along some wire work. Yes, I’m worse that a compulsive knitter! I planned to work on a bracelet like those shown in a recent blog. I cut the wire strips and copper sheet before leaving the house and stuck them in my bag. Unfortunately, when I pulled things out in the car to work on the bracelet, I had left the sheet out of the bag. So, there I sat in the Academy parking lot wondering what I could do with four 9 inch lengths of heavy copper wire and a spool of 26g weaving wire.

Yes, I could have just sat there and waited patiently, but creataholics don’t do that! I put those four heavy wires together like a column and started weaving around them in a circle. The pattern was rather addictive and fun to try. Later, when I returned to the piece, I realized it resembled (in my imagination) a branch and I added leaves here and there.

butterflies

I had already made couple of little torch enameled butterflies and they lit right on that branch. Whimsical?

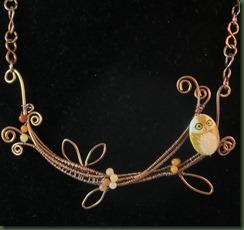
The next day I tried 5 base wires in the column and liked it better, although it took longer to complete. I used an owl bead on this one.

owl

Now I’m filled with ideas pertaining to other things that need to go on these branches. Yet, I guess I’d best see if anyone else likes them first. Even if they aren’t winners, it good to go out on a “whim” once in a while!

Creataholic

Anyone who knows me probably realizes that I’m a creataholic. I tend to make things all day, everyday. Yes, I still wash the clothes, cook, play with the dogs, yell at my husband (not really!), etc. but I really like to make things!

I spent so many years learning about and teaching about creative thinking that it’s really fun to get to actually “DO” creative thinking. No matter what I’m making, I find myself asking “how many different ways can I ……?” This phrase is generated following the ideas of Alex Osborne about fluency. One of my other favorite phrases from the formal Creative Problem Solving procedure (Trefinger) is “In what ways might I . . . ?”

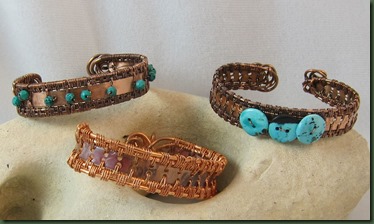
One of the tasks this week has been considering those two questioning phrases in terms of a new woven bracelet I’m developing. The form utilizes a simple weave wherein two outer pieces of wire are woven together with a copper strip about 1/2 inch wide. I’ve been punching holes in the copper strip so it could be part of the weave.

woven bracelets

The prototype bracelet is the one at the bottom of the photo. I torch painted the copper strip to get the red color and left the copper wire its natural color. It will, of course, oxidize later based on the environment. The other two are the first answers to the “how many ways” question. I embellished the one on the top right with some natural turquoise cut in button shapes with two holes. The bracelet on the top left has fewer holes and I cut them all in the center rather than on both sides of the copper strip. It has quite a different look from the other two when viewed close up. Both stone embellished bracelets were dipped in liver of sulphur to which I added a tablespoon of ammonia. It gives it a slightly different patina from plain liver of suphur.

Now the challenge will be in finding other ways to change this basic design without losing its simplicity. I may just have to conger up some basic creative thinking processes to help me continue to vary this design. Hmm . . . there’s something about fluency, flexibility, originality and elaboration . . . and then there were those Six Thinking Hats (DeBono) . . . (so many choices).