Category Archives: Techniques

Challenging Neck Armor

Today is the posting date for pictures of designs completed in a Yahoo group to which I belong (Wire_Wrap_Texas@yahoogroups.com) About a month ago, those who participated in the group’s challenge received a small package of beads with which we were to complete a project. Basically the only stipulation was to use most of the beads and include some wire work. The package contained a few glass beads, rounds, copper spacers, a small black donut and a large crystal nugget. The latter two didn’t seem to fit with the others and the challenge began! Being majorly compulsive, I wanted to dive right in when the beads arrived, but made myself leave them alone. I lay them out in a saucer on my desk and peered at them for a week or so while repeating, “incubation is a good thing.”

Part of my goal with the challenge was to combine multiple elements of metal and wire with more delicate seed bead work. At first, I envisioned a netting of tiny seed beads covering the crystal nugget and providing some color. While this worked well, and I now know how to do this, the crystal still didn’t fit with the other beads. I added a pewter butterfly and some ribbon and gradually, things grew worse! PICT05539 Laying it aside, I picked up that black donut. “Now what?” I wound ribbon around it, wrapped this with 24 gauge copper wire and finally embellished it with a bit of seed bead embroidery. I also created several different sizes of wrapped rings to go with this one and hung the ugly crystal inside the largest circle. Using wire links to put the necklace together it looked great in my mind but pretty yucky in real life. Would I post a picture of this one challenge day? Definitely not!

Finally, feeling that I had been challenged enough, I designed a moon shaped copper piece cut from sheet metal and hung dangles from the holes I drilled. The seed bead embellished donut now hangs from the center of the piece and the crystal nugget? Oh dear, . . . I must have lost it somewhere! PICT0548

Did I learn anything from this challenge? You bet!

· I learned that my skills do not always enable me to make what I see in my mind.

· I have again confirmed that too much embellishment, as in the case of the crystal nugget, can ruin a piece.

· I learned how to cover beads with netting and how to change the look of a form with ribbon and wire to create a unique pendant or link for a strand.

· I realized that incubation and resistance to closure is still hard for me even though I continue trying to improve.

· I am reminded that there is a certain level of frustration in a challenging situation that is good and propels us, while too much frustration inhibits progress. It’s a delicate balance and the physical and emotional place we are in at the time of the challenge greatly affects the rigor we can handle. I believe that we each have to learn what level helps us grow and branch new dendrites.

· Lastly, I learned that I like having friends who support my learning.

Low Maintenance

I’ve been called many things, but today my husband said I was “low maintenance.” I’m not sure whether to be insulted or pleased.

You see, yesterday he came home with a present, something I’d been wanting for a long time. It’s a Dremel, my very first power tool. If you are uneducated, as I am, in the field of powers tools normally relegated to the garage, you’ll need to know that this is a hand operated rotary tool with all sorts of attachments. It will polish, grind, sand and do about anything that goes round and round. The great thing is that it’s my size and fits my smallish hand.

This afternoon, I used it to PICT05456grind the rough edges and polish a piece that goes out tomorrow. It’s a new neckwire with removable/interchangable charms. It fastens with leather in the back. While the customer may not see a big difference, I do and feel better about my finishing work. I’m thinking that my new Dremel is my friend and I should say thank you, dear.

But what about my husband? Is “low maintenance” a good or a bad thing? I’m going to have to sleep on that one.

Ralph’s Rocks

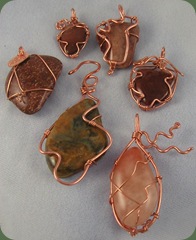
My friend Ralph has been bringing me rocks from Wildtype Ranch http://www.wildtyperanch.com/, near Cameron, TX for a year or so. He usually brings these tumbled treasures wrapped in a handkerchief and it’s fun to see what emerges. Originally, we thought I might use them as cabachons in bead embroidery, but the irregular shapes and curved backs have made that quite difficult. Finally, while cleaning the studio this past weekend, I rediscovered them and was determined to make them work for something. Some of the wire-wrapped results are shown in the picture. PICT0475 They have been a real challenge since traditional wraps have not worked for very many of the rocks. I’m hoping that after some buffing to remove the dings from my pliers Ralph’s Rocks will make nice pendants. Do you think I can call this is “freeform” wire wrapping? I’m currently working on a neck armature that these can be used to adorn (one rock at a time, of course).

By the way, if you’re looking for excellent beef, check out the Wildtype website. They market delicious pasture raised Angus beef.

Technique-Like Riding a Bike

Technique, to this former music teacher, has generally pertained to the basics of musicianship. At the ripe age of 5 years old, I was taught by my second piano teacher, Mrs. Ida Defoe Hardy, (my mother was the first teacher) that if you had good technique and kept practicing your scales, you could learn a piece more quickly and easily. Long ago, when I was young and rule-bound, I did what Mrs. Hardy said and later realized she was right. My good piano technique, curved fingers, strong hands, scale facility, etc. has stayed with me even though I play less frequently.

Yesterday, at the nursing home with my 87 year old mother, I was again reminded about the value of technique. A new organ was donated to the nursing home and Mother has been wanting to play it. I would wager that it has been a minimum of 15-20 years since she touched an organ and with her crooked arthritic fingers, I feared the worst as she approached the keys. Yet, I was the one who got a BIG surprise. Although it wasn’t perfect, the music was recognizable, the rhythm consistent and the smile on another resident’s face as she listened to Mother was genuine.While I was pleased with the sound, I was even more impressed with Mother’s technique. Her crooked fingers were curved as she sat up straight. In organ lessons, we learn to lay the thumb on its side in order to depress two keys at the same time while reaching other fingers to far away keys. Mother did this repeatedly without consciously thinking about it. I guess good TECHNIQUE lingers for years. It IS like riding a bicycle; you never forget it. The longer we’ve practiced a technique, the better the skill, and the less likely we are to lose it. (Isn’t this why elementary school teachers urge parents to keep their young readers in the print through the summer months? The more unskilled the reader, the more they lose through idleness. Adults, don’t have to do this because our skill is fully developed.)

Design work certainly requires technique as well. We practice the basics such as crimping, making a wire spiral, etc. repeatedly and these become so natural that we are free to think of other elements. As a beginner, I wanted to be creative and add my own style, but there were many disasters largely because I didn’t have the basic skills perfected. Now, years later, many of those techniques are natural and my brain is free to consider other things. There must be a lesson here! I think my guide should be that when learning a new element (currently, the element is how to make my own wire clasps), I should practice until the process becomes more a part of my technique before deciding to alter it. I don’t like doing the same thing over and over, but in the case of basic technique, it is needed.

I can still hear Mrs. Hardy saying, as I later told my own students, you can’t improvise on Bach until you can play it the way he wrote it! OK Mrs. Hardy, I think I’ve finally got it!

Inspired Color Bursts

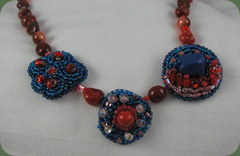
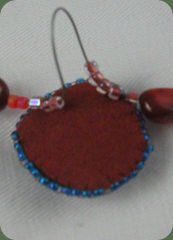
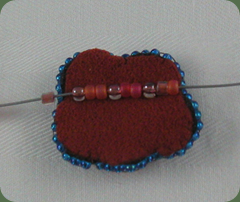
I met The Doll Maker quite by chance at a church bazaar in December of 2008. Since then, I have thoroughly enjoyed reading her monthly newsletter complete with outstanding color photos of her adventures. The Doll Maker has given me permission to list a link to the newsletter found at http://weepeeple.com/news/february2009newsletter.htm . The February installment features pictures from her trip to Mexico and displays a wonderful array of bright colors. I think the artisans in Mexico use the “no fear” color method where almost anything works together and I especially I like the way vibrant colors paint the landscape. Inspired by the pictures from Mexico, I decided to “paint” a necklace using bead embroidery. PICT0379b The embroidered circles use electric blue and shades of orange seed beads stitched on Lacy’s Stiff Stuff and backed with Ultrasuede. I  jumped right into this project without a suitable answer regarding how to attach the embroidered pieces to the necklace. I believe that part of the creative process is continuing the work when no plausible answer to a problem is visible. It’s been hard to learn to trust that an answer will be conjured, however, I ’m learning to trust myself. After I completed all the pieces, they spent several days on the design table staring at me as if to say “now what?” Finally, it dawned on me that I could stitch a couple of small beads on the back of each circle and thread the necklace wire through these. PICT0386b I added a few extra beads in order that the wire would be hidden on the back of each piece. While I can’t attest to whether or not my customers will like this style, I can be assured that I learned from creating it.PICT0383b

Bead Embroidery Plus

The plus in the title stands for leather and wire. As you can see in the photos, I’m experimenting with combinations. Initially, I constructed five wire hearts and connected them with finer gauge wire. I used seed embroidery to attach the hearts to leather backed with Lacy’s Stiff Stuff. PICT0368a

Then I sandwiched a shaped piece of metal between this top layer and a base layer of Ultrasuede before stitching on the edge to hold the pieces together. The pendant on the right is just over 2 inches in diameter with copper wire hearts. The one below is a bit smaller with brown artistic wire hearts.

PICT0371a

Can You Fly?

It’s not a secret. I love my Blue Heelers and although the puppies shown in the picture_DSC7409x are gone, I still enjoy walking or playing ball with the older girls each afternoon. Today I was particularly taken by Frosty’s “never give up” attitude. She’s the dog on the far left of the picture. Even as an adult dog, she still believes that she can fly. When a large bird, usually a buzzard, looms over head, Frosty chases across the ground in an effort to reach it. Today, as the bird flew completely across the yard, Frosty ran as fast as she possibly could and I had to move out of the way to keep from being run over. At the end of each of these bird runs, she leaps high in the air in a last supreme effort to grasp the bird. I keep telling her that these efforts are foolish, but she just doesn’t get it. I can easily say that my wire working is a bit like Frosty’s bird chasing. I’ve been struggling with it for months now, working flat out until my hands ache in an effort to improve. Yet, like Frosty, I never can quite catch that perfect technique. wirework2 Often, upon completion of a wirework piece, I sigh and admit that it is terrible, but like Frosty, the next time an idea arrives, I delve into it again. Shall I persevere like Frosty and keep working at this technique? The piece I did last night seems more pleasing than most have been. It does give considerable satisfaction to be moving closer to the mark, but will I ever FLY? If I keep watching my dog, rereading that children’s book, The Little Engine that Could, and continue repeating “I think I can, I think I can,” then I believe there is hope! Perhaps we can all FLY! (Thanks Frosty)

Hidden Metal Technique

The pendant shown in the last post required the use of hidden metal for stabilization. While this may be a common technique, I’ve not previously read about it; yet it makes sense. I’ve worried about the use of small cabochons in bead embroidery since the surface area for gluing them is so small. Speculating that more stabilization behind them might help this problem, I’ve been adding a piece of sheet copper or brass behind these pendants between the embroidered top and the Ultra suede bottom. This is likened to the way embroidered cuffs on metal blanks come together. The metal piece for each pendant is the same shape, but slightly smaller that the embroidery work. I’ve been experimenting with this since last July and thus far the technique has been successful. It has helped the pendants remain crisply shaped. My thought is that the more a piece bends, the more likely the cabs to come undone. Other posts with pictures of designs using this technique are dated January 14, 2009, December 26, 2008 and December 28, 2008. There are, of course, other ways to stabilize a piece including adding extra layers of Lacy’s Stiff Stuff, but I’ve found the metal approach quite satisfactory without significantly adding extra thickness.

A new challenge is to incorporate this technique in a manner that tastefully exposes part of the sheet metal with the bead embroidery. That potentially yummy recipe sits simmering on a back burner but is rapidly approaching a boil. We’ll see if anything cooks up.

Anticipation

PICT0345 Oh Spring, Oh Spring Where art thou Spring? I found a bit of it amongst my seed beads. While the dark color in this necklace may not appear thus, it is a lovely purple that looks like the season I’m hunting. I like how the dark hues bring out these pastels for Spring. This freeform piece began as a small pendant, but as time wore on at the hospital with my daughter, referenced in my last blog entry, I just kept beading and looking for that inner calm that the work can bring. It went from small pendant, to bracelet and finally emerged as a necklace with the structural peyote extending in a narrow band completely around the neck to fasten. I don’t know when I’ve struggled so with a piece, but daughter Kim just kept coaxing me on and making suggestions until it was finalized. Perhaps the nature and emotions of the situation in which a beader creates adds that element of tension to make one think in different directions. Resistance to closure builds until we finally become fluent enough to think of a viable direction for the piece. While UFOs (unfinished) are reasonably common for beaders, there was just something about this piece that couldn’t or wouldn’t be put aside. If you read my last post about the Tiny Diversion, you will understand when I say the necklace reached a difficult point about the time we knew the premature baby would spend time in the neonatal intensive care unit. Perhaps this it my symbol for survival for the child. Determination . . . trust . . . and faith . . !

No Hammer Required

It appears that most of my recent posts have shown products that required some hammering. Not wanting to seem in a rut, I used a needle and fishing line (Fireline) to secure the beads for the pendant I just completed. pendent I enjoy doing bead embroidery, but haven’t found that the cuff bracelets commonly made with this technique sell as quickly as I would like; therefore, I’m using the technique to make more pendants than bracelets. A photo of a cross pendant completed with bead embroidery was in an earlier post. I tried to think Spring in choosing the colors for this pendant. Although it’s difficult to tell in this picture, the light colored beads are yellow which is supposed to be the “hot” color for Spring and Summer. I used cobalt blue seed beads around the turquoise cabs and a white pearl for the center. This piece is backed with green ultra suede and I put a piece of copper sheeting between the pendant layers so it wouldn’t bend. I may use dark blue and yellow in the neck strand before marketing this piece.