If you are not a jewelry designer you may not recognize the term in the title. Thinking outside of the design realm, I can think of a few “cold” connections I’ve had with people. You know, those encounters that leave you feeling unwelcomed and flat. These are the opposite of those warm welcomes you get from real friends.
Cold connections in jewelry making refer to the way we put things together, often in layers without using heat. I’ve been experimenting with the type of cold connections called riveting. Yes, my spouse is calling me Karen the Riveter, but luckily, I doubt you will be seeing my picture on any soon-to-be famous posters like Rosy the Riveter.
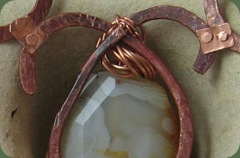
I would call a plain wire rivet the foundation for this technique. Constructing this requires creating holes in the pieces to be layered and inserting a piece of wire through the holes. You then flatten each end of the wire creating a small head that holds things together. This is done on both the top and bottom of your piece. This is easier said than done and it has taken considerable practice to make this type rivet work. Below is a photo of a necklace using a plain wire rivet. The rivets connect the large S’s to the focal.
 I riveted a small piece of sheet metal to each wire component It’s easier to see from the back of this piece.
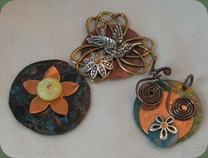
The pendants/charms below show more riveting I just finished.
I used the same plain wire method for E.T.’s bicycle and flower. The other two pieces are riveted with wire on which I balled the ends with my torch. I know that I said “no heat”, but I was just making a big head pin, not connecting!
I really like using the balled wire since this means you only have to flare the backside of the rivet. It’s much easier. The problem that I’ve experienced is in balling the 14 gauge wire required to go in my 1/16 inch holes. This gauge of wire does not melt and ball  very quickly and I’ve ended up creating a little oven type structure to aid the process. This structure, composed of old charcoal blocks and solderite has two walls and a bottom. Using the tweezers, I hold the wire in this little structure while I torch and this helps reflect the heat back toward the wire instead of out into space. It still takes a good length of time, but I think it’s worth it.
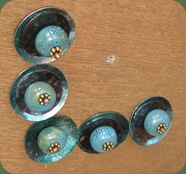
The last photo shows my first attempt at riveting ceramic beads . . . without breaking them. If you look closely, you can see that each part has 4 layers. From the top down, these are a brass daisy spacer, the bead, a dark copper disc and a teal colored copper disc to which I applied alcohol ink. This will become a necklace, but I’m still playing with how to connect or hang the pieces. They will have a propensity to flip and I’m trying to preplan and avoid that problem in the finished necklace. At the moment, I’m just feeling good about the riveting and not ready for the next challenge. You may notice that some of the wire balls became a bit flat as I worked on the bottom of the rivet. I’ve got to go back and fix that.
There are all sorts of other types of rivets including nail heads, tubes and decorative manufactured rivets. I have tried to nail down the basic technique before doing much with the others.
I hope rivets won’t leave you feeling cold. They really are a great connection!


