Category Archives: Wire Work

In the News

Following is a nice article that was published in the New Braunfels Herald-Zeitung several weeks ago. I apologize for the grainy photos, but they were scanned from the newspaper. (Can you tell by the photos how much I enjoy teaching these classes?)

Reprinted with permission from the New Braunfels Herald-Zeitung:

Jewelry Lessons   image

By Betty Taylor

The Herald-Zeitung

A group of 11 women hammered away Tuesday night at copper wire in the art room at New Braunfels Ninth Grade Center, before holding up tiny loop clasps and comparing their work.

“I’m ready to open a jewelry store now,” said Gail Profant, as she and friend Patricia Schlichting burst out laughing.

The Jewelry Making and Wire Work class was the first of a set of three taught by Dr. Karen Meador of San Marcos as part of New Braunfels ISD’s Community Education program. Meador said she has been making jewelry for about 12 years. She also teaches torch enameling and basic soldering.

On Tuesday, participants learned how to make earrings and a necklace. Techniques included crimping and how to bind beads to wire.

“I’ve always wanted to learn how to make jewelry,” Schlichting said.

Carole Bartram also signed up with friends for the class.

“We just all wanted to learn how to make jewelry and have some fun doing it,” she said.

Meador provided the supplies for the class as well as tips on the best kind of beading wire; how to keep copper from turning color; and keeping beads from popping off of necklaces.

Marilyn Johnson has been making jewelry for more than 10 years, but wanted to take the class to learn more techniques. Chris Newton said she wanted to learn how to repair her own jewelry.

For the next two classes, students will be making chains with S-links and jump rings that they will turn into charm bracelets and necklaces; a “smile” necklace featuring a curved piece of copper set with beads; and a copper wave bracelet embellished with beads.

image

Sharing Hearts

It isn’t even February, yet, I’m making heart shaped pendants. It just seems like the thing to do! I prepared the two in the photo because I wanted to experiment with making bails for an upcoming meetup of designers.

hearts

The bail for the heart on the left is made from a small piece of copper sheet soldered on the back. The one on the right utilizes a bail made from wire, also soldered on the back. My grandson told me that this heart has heartworms! Hmm, I really didn’t see it that way, but I’m not three years old. I used my new leather sand bag as a base for creating the doming effect on both pieces. I dimpled them with dimple pliers. By the way, thanks to a talented friend, I was able to saw the heart shape from the middle of each piece. Thanks Adele!

Following is another photo of a heart pendant made for the same meetup. I torch enameled the copper rectangle and riveted the heart, cut out of the center of a piece shown above, to the metal. I used a tube rivet which gives it some dimension. The back shows the small piece of tube I soldered to the metal for a bail.

heartfront  tube bezel

The photo below doesn’t seem to fit with this blog entry . . . yet, it is the essence of “heart”. It was commissioned by one adult sister for another in remembrance of their girlhood when they watched the cardinals together. I’ve shared this previously online, but wanted to repeat. Wouldn’t you say the giving sister was “sharing heart”?

cardinal complete

As Valentine’s Day approaches, I hope that commercialism doesn’t remove the heart from the giving. It often seems that men, in particular, are harassed by the advertisements to a point where they feel they must spend a good deal of money for their sweeties. I hope the men I know will understand that this woman just wants a little “heart” in one form or another.

Shields


After running the Christmas gauntlet of jewelry shows, I wondered if I would have any ideas left for starting anew. I shouldn’t have worried since the holiday’s usually close with renewed inspiration to create again. This year, I’m making an honest effort to add some different looks to my pieces.

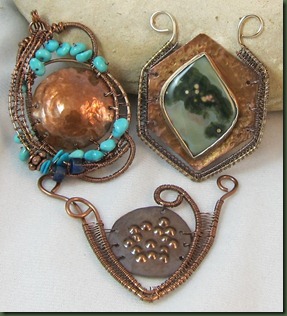
One new idea in particular resulted from a metal disc my son-in-law hammered while showing me how to use my new leather sandbag.  While the family tried to rest after Christmas dinner, the two of us sat on my studio floor and hammered. Oh what fun . . . Later, I picked up the disc he made and turned it into a shield.

shield1

This shield is on the top left. It has multiple dimensions and weavings and is adorned with turquoise and lapis. The challenge for this piece was adding extra pieces of wire and trying to keep the weaving even. I wasn’t completely successful on the latter.

The shield on the top right sports a sterling silver bezel on textured copper. I added both sterling silver and copper wire to support the weaving.

The bottom piece was simple to make and may need more embellishment before it is complete. I used dimple pliers to create interest on the disc.

The challenge for now is how to best hang these pieces to enhance the look. It would be easy for me to end up with a box full of pendants, but these need to become necklaces soon.

The final photo is of a shield that did become a necklace. It’s too bad that close up shots not only show the flaws in the wire work, but also those on the face! Oh well, I earned every one of them.

karenshield

Vining

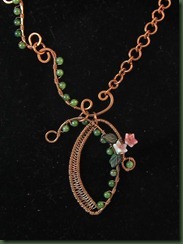
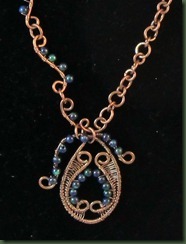
I enjoy making handmade chains. If my hands would hold up, I could sit for hours twisting “S” links and making jump rings; yet I wanted something a bit different for the design below. As it developed, I began to picture a vine running along one side toward the wearer’s neck. First I made the chain without beads on the vine, but now I think it’s better adorned with them. See what you think.

vine sweet pea

My friend from Magpie Gemstones , made a few suggestions and I think the design is working now. Another friend named the above necklace “Sweet Pea”.

Below is another version. You can also see that I’ve played with the use of different size jump rings to add a bit of interest.

vine lapis

My analogy for the initial necklace may be a stretch, but here goes any way. As so many of us gather with family members and/or friends this special time of the year, it seems to me that we are vining. Vines often reach toward their nourishment whether it is sunlight or water and it seems that people do the same. We lean towards those who nourish us by listening, caring and sharing our lives. While we may originally “vine” in one direction, later that part of the growth may wither and we vine in another direction depending upon our needs. I watch my ivy houseplant do the same thing. It grows well in one direction and then I notice it withers and needs trimming. Once trimmed, it angles off toward something else. It doesn’t seem to inhibit the plant as it takes the process in stride. As we traverse our own growth including changes in relationships and in families, it may be important to consider new directions or perhaps to better nurture those old ones. I think we just need to keep vining.

Everyday Tiaras

Playing with wire one evening, a seemingly familiar shape emerged in my hands. Who knows whether it came from my subconscious while thinking about my long ago high school years or from something else. My high school class just celebrated our 45th reunion in Medford, Oklahoma. Although I didn’t attend, the photos and notes from classmates brought back a flood of memories long buried, but still reachable. While I don’t remember too many high school dances, I do remember my last prom. I had been sick and out of school for three weeks, but managed to get it together and make it to the prom. After all, I already had a date! It was an eventful day of preparation during which my mother burned a hole with the iron in the chiffon overskirt of my long blue dress. The local dry goods store saved the day. There she purchased blue plastic flowers which she sewed on the dress to cover the hole. I remember that she was much more upset than I was.

I also remember that my hair wasn’t in very good shape, but we managed to adorn it with a pretty sparkling tiara. It seems to me that it looked much like the one in the photo below (from Tiara Town). It was probably much smaller

tiaras

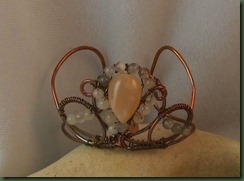
That shape stuck with me and I recognized a similarity in the wire shape I made the other night. It became the bracelet below.

tiara bracelet

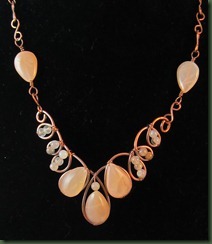
I also turned the shape upside down and made a necklace.  If you stand on your head and look at the necklace below, you should be able to see the tiara – or you could just believe me! This particular piece and the bracelet above are both made of moonstone from Magpie Gemstones. I made another similar necklace out of sterling silver wire with grey colored moonstone, but it found a home before I could take a photo.

tiara necklace

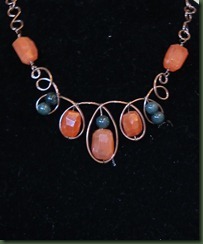
Today, I tried my hand at a smaller necklace, shown below, that has less loops. I really think I prefer the loopier one. All of these are finished with handmade chain and clasp.

tiara small

These necklaces are fairly easy to make and the bead placement helps secure the wire loops in place at the top.

I think there are a few more jewelry tiara designs in my future, but I don’t anticipate ever needing to wear one on my head again. I’m either afraid or relieved that those days are past – I wonder which . . .?

In the News

I’ve been remiss in not sharing a little success via this venue. This month, October-November, Step by Step Wire Jewelry published one of my pieces. Below is their photo of my Tri-Loop Necklace.

tri

This example was made in sterling silver with lovely amethyst stones from Magpie Gemstones (www.magpiegemstones.com) There’s a very long period of time between having something accepted by a publisher and actually seeing it in print. The publication also contains my complete tutorial for the necklace where you can find out the sneaky way I make those tri-loops. These are NOT made on a jig.

My friend, whose sister works for Disney, calls this the hidden Mickey necklace. Just look at all those ears. She purchased one for her sister in copper and it looks great. I was pleased to see it. Someone who read the magazine also sent me a photo of her version of the necklace. If you make one, why not send me a picture too?

Also, I have another piece that should be out in the same publication in a couple of months. I’ll let you know when it’s available.

Fishing for Ideas

If you’ve ever worked with preschoolers, I’ll bet you’ve enjoyed magnet fishing. You put a paper clip on the ends of paper fish and a magnet on the end of a homemade, kid-sized fishing pole and then “attract” fish. My grandson likes to put his fish in a bucket and use it as a fishing pond. We’ve been playing this for over a year and it doesn’t seem to get old.

G fishin

Many times, I end up “fishin” too, but it’s usually not in a bucket. It’s usually in my head when I’m fishing for ideas. I may be looking for something new and different to add to a design or for some way to solve a problem. This week it was the latter.

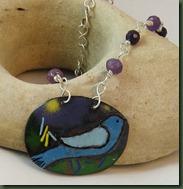
I’ve been stuck on making birds lately and have explored how to do it with embossing and torch enameling.

torch bird

After making a couple of these, I realized that the two don’t mix real well. For embossing, we need a light gauge metal and for torch enamel a heavier metal. When I use the gauge I need for embossing and then enamel the piece, it curves a bit toward the back. Yesterday, while fishing for ideas, I tried riveting another piece of metal to the embossed one and then enameling. It was NOT a good idea. Much of the heat was lost between the layers and I completed a very rough and ugly bird. No, you cannot see it because it’s in the trash. So, I guess I’m going to need to get my idea fishing pole out and try again.

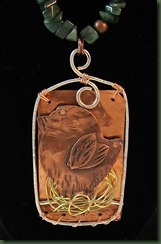
I did, however, have one bird that turned out well. He/she is a sample piece that combines elements from several of the classes I teach, soldering, riveting, wire wrapping, forging, etc. Although you can’t tell from the photo, I used tube rivets to help the bird stand about 1/4 inch away from the back plate. The bird is mixed metal including copper sheet, 1/10 silver wire and brass wire for the nest. Today’s issue is how to make it smaller.

birdie

I asked my spouse if he thought I needed eggs in the bird’s nest, but he didn’t think so. We decided that bird was just too young to mate. After all it did just hatch at Dreamcatcher Designs.

Here’s hoping you catch whatever you are fishing for.

Waving

How do you wave at folks? Do you just raise one little pointer finger to acknowledge them are are you an all-out-use-your-whole-arm waver? The latter is the kind I see outside a certain San Marcos business. He’s waving with his entire body as he dances to the music emitted into his earphones. He’s been waving there for so long that they’ve even made a billboard about him. Did I mention he’s really skinny too? All that waving seems to pay off in one way or another.

I’ve been waving with my wire jewelry for years. I started with a simple wire wave bracelet and continued by making wave necklaces. Originally, these were made from recycled copper wire, but now I use new 14 gauge for the pieces. They've also gotten a bit shorter recently. You can see the bracelet contrast in the photo below. Obviously the shorter piece is not yet completed. If you want to make these yourself, I have a free tutorial for the bracelet published on the Magpie Gemstones’ (www.magpiegemstones.com) site: http://www.magpiegemstones.com/wave_bracelet.html

short wave

I’ve also tried waving with different shapes.

wave tri

Here are a couple of versions of the newer wave necklaces. The first features riveted copper charms (faith, hope and love).

wave necklace2

The second is embellished with amethyst stones and the wave is a bit more full.

wave3

I guess I’ll keep coming back to this standard in my jewelry line and continue to perfect my wave. How about you? What kind of waver are you?

The Royals

I’ve been calling the bracelets below “my royals”, but in writing about them, I thought that “royal” should have more connotations that simply referring to a king, queen or other sovereign. My search for the truth, however, kept ending on sites pertaining to the Kansas City Royals. This was not what I was looking for. The term is used in phrases such as “he’s a royal pain in the . . . “ where it means extremely bad. It can also be used to mean excellent as in “let’s give them a royal welcome.” I was also amused to learn that royal can indicate a stag with large antlers that have 12 or more points on them. I wonder what The Royals in England think about that definition.

Unfortunately my royals are not full of the crown jewels and they aren’t sparkly, but at the least, the one on the right is shaped like a crown. Ok . . . so I’m stretching it just a bit. Give me a break!

royals

The “princess” bracelet on the right of the above photo is made from a combination of two of my etsy tutorials, the dimensional bracelet and the woven bracelet. I wanted a new shape in the middle and this tiara form emerged. I put in the stones, but felt it still needed something; therefore I added the weaving. I think it could be done with bright crystals and more elaboration, but I’m just a simple gal.

Princess

The “queen” bracelet below sports a star at the middle top and is adorned with lots of turquoise and some carnelian. It is the cursive style bracelet that just ended up with a little extra width and more dramatic swirls. I guess this one is fit for a Texas queen.

queen

My final assumption about “royal” is that the term can stand for extremes or outliers, whether they are good or bad. England’s Royals are outside the norm in status; The Kansas City Royals hope to be the same when they play ball, but may sometimes give their owners a “royal pain” and as for my bracelets . . . time and customers will tell.

Fun with Fiber

From time to time I have attempted to add fiber to my designs, but haven’t had much luck. I’m not sure whether I just don’t like the look of fiber or I don’t like the look of fiber the way I use it. My bet is on the latter! Yet, seeing the fiber adorned designs of other jewelry makers participating in Lori Anderson’s Bead Soup, mentioned a few posts ago, I decided to try again.

I was fortunate to have the opportunity to go to Britex Fabrics (www.britexfabrics.com)  in San Francisco a couple of weeks ago. My daughter and I had allotted ourselves 45 minutes before we needed to hop a trolley and move on. It wasn’t enough time! There are multiple floors to this shop but I went straight up to the third floor filled with notions. I was pretty overwhelmed by the ribbons, trims, cords and buttons and had to keep talking to myself about remaining focused on what I needed. The pieces below utilize a couple of the ribbons I purchased.

The pendant for the blue piece below is polymer clay and made by Nora Pero of Austin, TX. I intended to use the ribbon around the back of the piece, but used too many beads and then realized it wouldn’t show. I’m pleased with the colors.

polymer1

The bright piece below is whimsical and initiated with the torch enameled owl. I like the amber in it and appreciate the lightness it brings both in color and weight. I also used some faceted carnelian which hangs from the handmade chain. I thought the ribbon was a good match.

owl1

The challenge for me with fiber seems to now be how to do something besides a side bow. The additional challenge is to find one of the boutiques I serve or an independent customer who will like the look of fiber.